Violin Sheet Music Scanner: How to Scan and Read a Violin Part
Need a violin sheet music scanner that plays your part back before the lesson? In this guide, we walk you through reading a violin part, from the open strings to finger numbers, bowings and shifts, with a clear picture for each, then show you how to scan it.

Your teacher hands you a new piece on Tuesday, and the next lesson is a week away. You can see the notes, but you are not sure how the phrase should go, where the shift is, or whether that C should be sharp. A violin sheet music scanner that plays the part back is one way to find out. Knowing how to read what the violin part is telling you is the other.
Violin music is written on a single treble staff, one note at a time most of the time. That makes it friendlier than piano music. But a violin part carries extra instructions that other parts do not: which finger to use, which way to move the bow, which string to play on and when to move your hand up the neck.
In this guide we go through those instructions one at a time, with a picture for each. Then we show you how to photograph a violin part so it reads cleanly, and how to practise with it playing back, whether you take lessons or teach yourself.
How to read a violin part
Step 1: Know your four strings
The violin has four strings, tuned (from lowest to highest) to G, D, A and E. Played without pressing any finger down, they are called the open strings. Violin music always uses the treble clef, so here is where each open string sits on the staff.
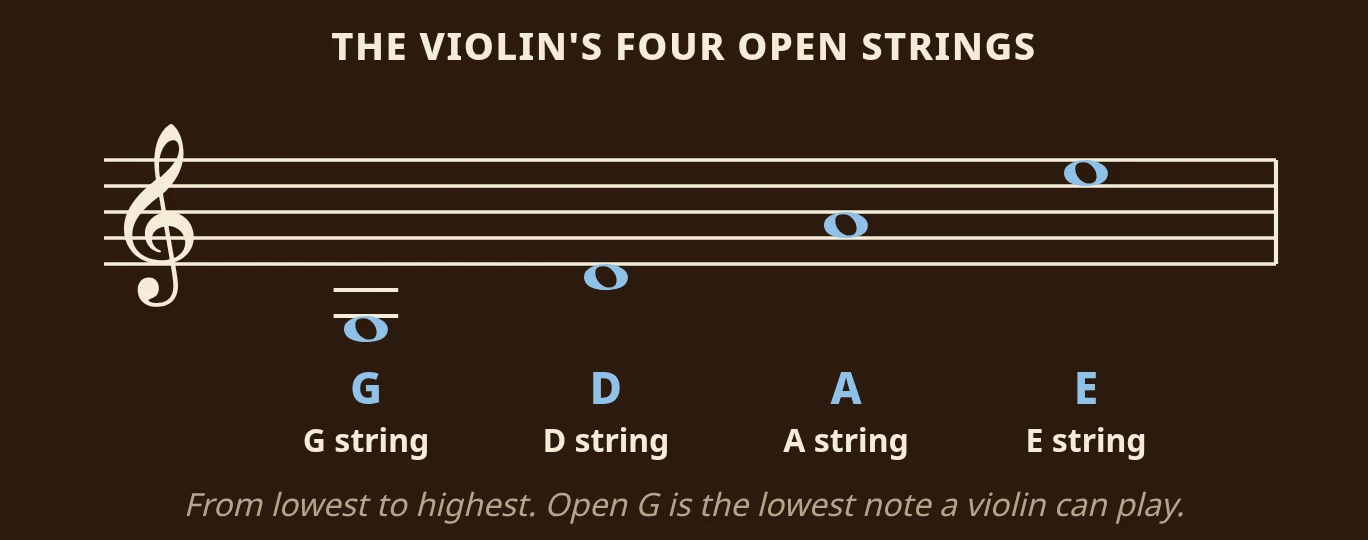
The open G hangs below the second ledger line under the staff, and it is the lowest note the violin can play. The open D sits just below the staff, the open A is in the second space, and the open E is in the top space. Every other note you play is found by pressing a finger down on one of these four strings.
The common mistake for beginners is to learn notes only as finger positions and never connect them to the staff. Try to do both: when you see a note in the second space, think "A, open string" at the same moment.
Try it today: play your four open strings slowly, saying the note name out loud and pointing to where it sits on the staff. Then look at the first line of your current piece and circle every open-string note.
Step 2: Read the finger numbers
Violinists number the fingers of the left hand from 1 (index finger) to 4 (little finger). A 0 means the open string. Many beginner editions print a small number above a note to tell you which finger to use. Your thumb is never numbered, because it stays behind the neck.
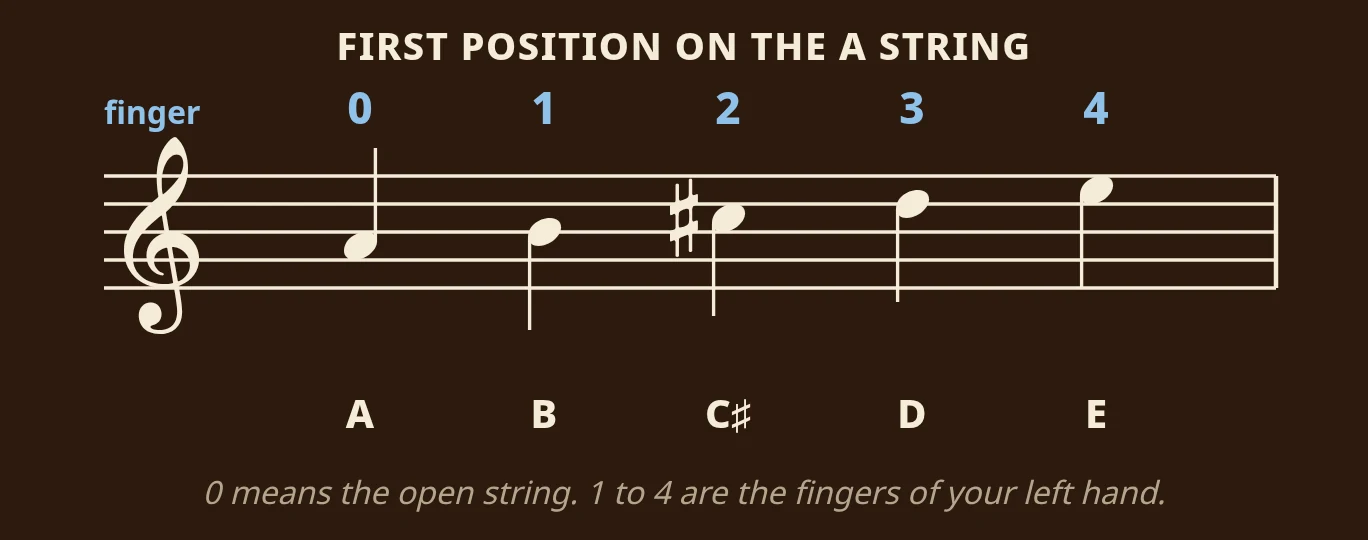
Here is the A string in first position, the hand position nearest the scroll. The open string gives you A. Finger 1 gives you B, finger 2 gives you C sharp, finger 3 gives you D, and finger 4 gives you E, the same pitch as the open E string next door.
Notice that the second finger plays C sharp here, not C. Whether your 2nd finger sits "high" (close to finger 3) or "low" (close to finger 1) depends on the key signature and any sharps or flats in the bar. That is why it pays to check the key signature before you play a single note. In D major and A major, the C's are sharp, so finger 2 sits high on the A string.
The common mistake is trusting the finger number alone. The number tells you which finger, but the sharp or natural tells you exactly where that finger goes. Read both.
Try it today: play A, B, C sharp, D, E slowly on the A string, then play A, B, C natural, D. Listen to how far the second finger moves.
Step 3: Follow the bowings
Your right hand needs instructions too. Two small symbols above the notes tell you which way to move the bow, and curved lines tell you when to keep the bow going through several notes.
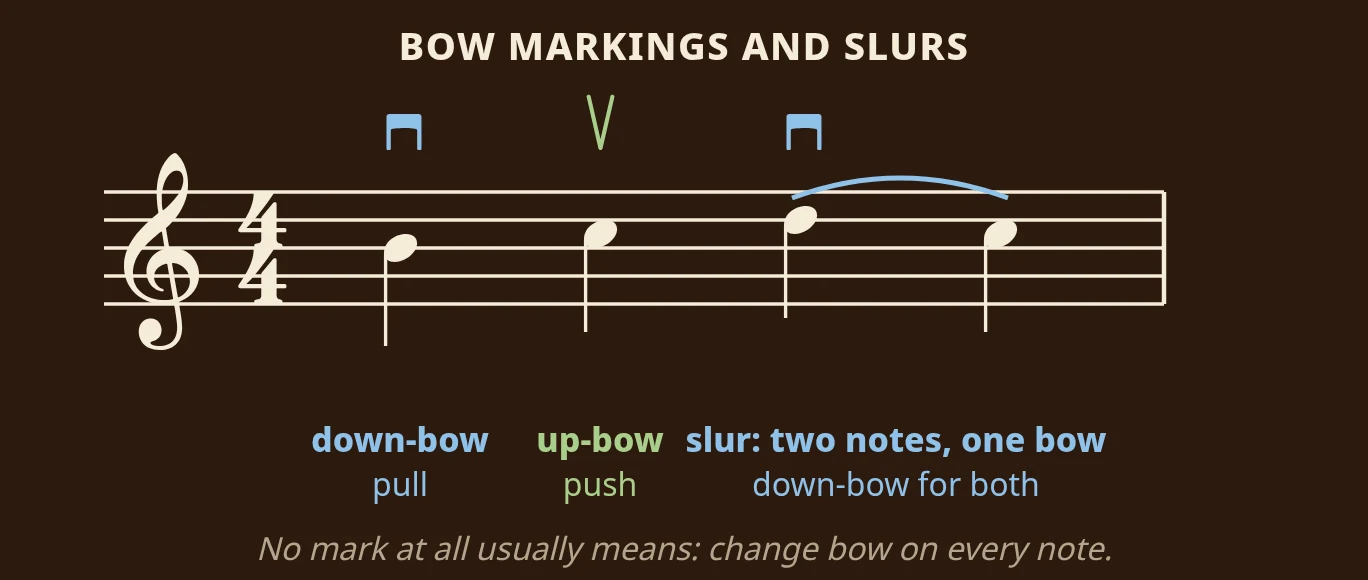
A down-bow looks like a little table or a square bracket. It means pull the bow, moving your hand away from the violin. An up-bow looks like a V. It means push the bow back towards the violin. Down-bows naturally feel stronger, so they are often used on the first beat of a bar.
A slur is a curved line over or under notes of different pitches. On the violin, a slur means "play these notes in one bow, without changing direction." In the example, the last two notes are slurred, so you play both in a single down-bow. When there is no mark at all, you usually change bow direction on every note.
Do not confuse a slur with a tie. A tie joins two notes of the same pitch, and you play them as one longer note. A slur joins different pitches, and you play each one, just in the same bow.
The common mistake is ignoring the bowings in the first week and then finding the bow is going the wrong way at the strong beats. If bowings are printed, follow them from the start. If they are not, pencil in your own after your teacher shows you, so you practise the same bowing every time.
Try it today: on one open string, play four quarter notes with separate bows, counting "1, 2, 3, 4". Then play the same four notes slurred two by two. Make the two slurred notes sound even.
Step 4: Understand positions and shifts
So far, your hand has stayed in first position. To play higher notes, you slide your whole hand further up the neck. Each place your hand settles is called a position, and moving between them is called a shift.
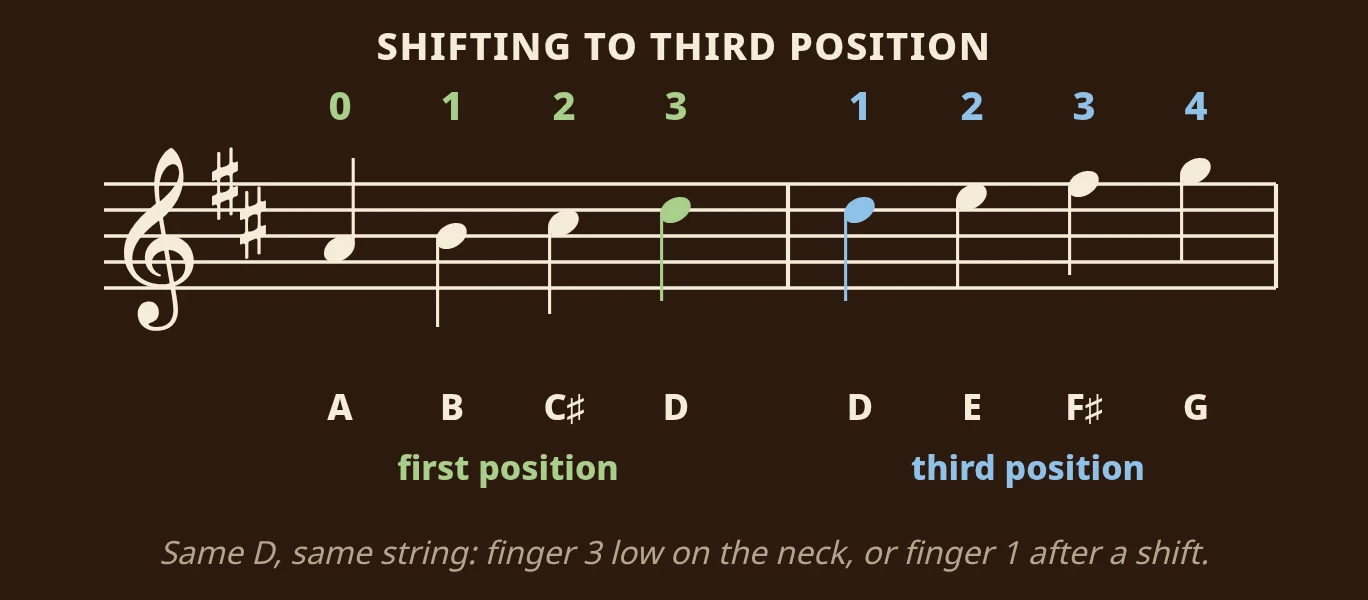
The example is in D major, so every F and C is sharp. In first position on the A string you play A, B, C sharp and D with fingers 0, 1, 2 and 3. To keep climbing, you shift to third position: the same D is now played with finger 1, and fingers 2, 3 and 4 give you E, F sharp and G. Same string, same note, different finger.
That is the key idea about positions. The note on the page does not change; only where your hand is changes. Editions often print the finger number on the first note after a shift, so a "1" on a note that would normally be finger 3 is a hint that you should move your hand.
The common mistake is shifting late, in a rush, on the note itself. Plan the shift a note early, and practise it slowly so you can hear the note land in tune every time.
Try it today: play D with finger 3 in first position, then slide your hand up and play the same D with finger 1. Go back and forth until both sound exactly the same pitch.
Step 5: Spot string markings, pizz. and arco
Sometimes the composer wants a passage on a particular string, for its sound. A few other words tell you to stop using the bow altogether.
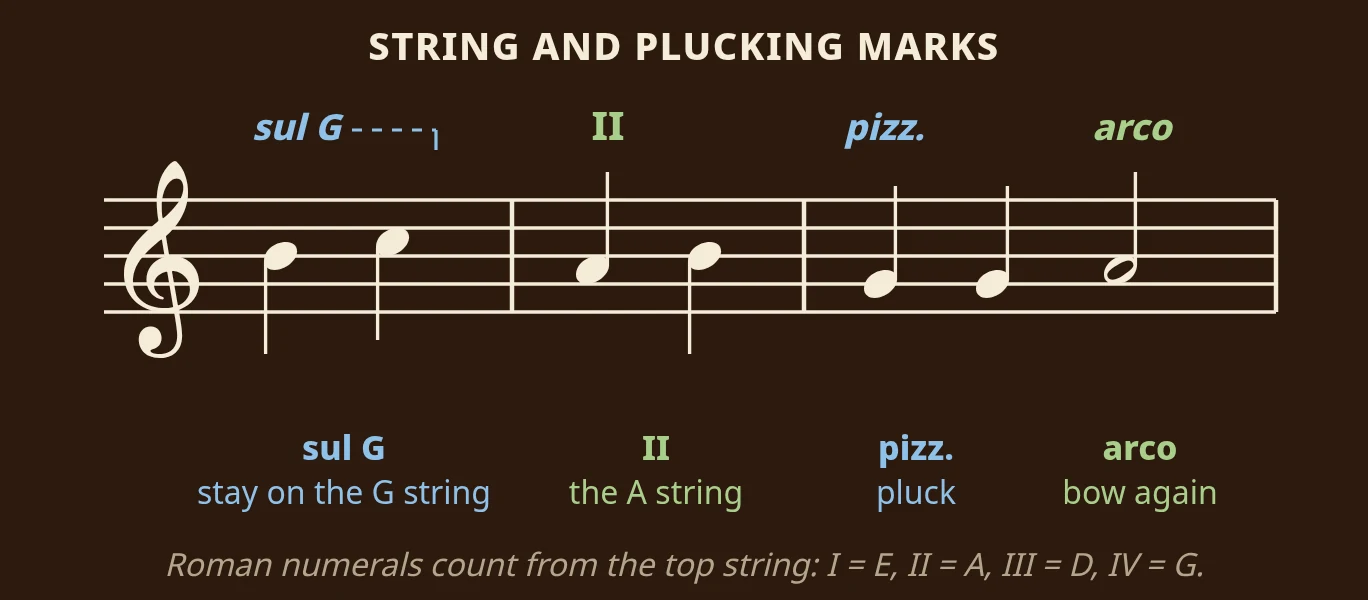
- sul G (Italian for "on the G") means play the passage on the G string, even where another string would be easier. A dashed line shows how long to stay there.
- Roman numerals name the string too, counting from the highest: I is the E string, II is the A string, III is the D string, and IV is the G string.
- pizz. (short for pizzicato) means pluck the string with a finger of your right hand.
- arco means pick up the bow and play normally again.
The common mistake with pizz. is missing the "arco" that follows and plucking the rest of the line. When you see pizz., look ahead and find where arco comes back before you start.
Viola, cello and other single-line parts
Everything above applies to any single-line part. Viola music uses the alto clef, which puts middle C on the middle line of the staff. Cello music uses the bass clef, with the tenor clef for high passages.
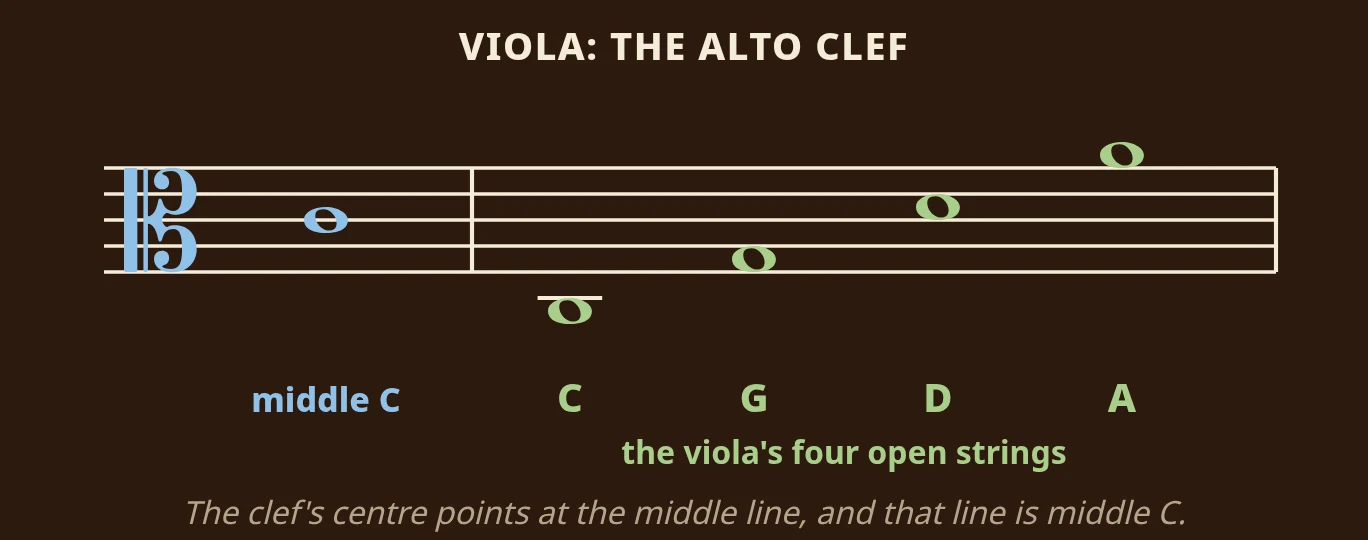
The viola's open strings are C, G, D and A, a fifth below the violin's. Once you learn where middle C sits in the alto clef, the other notes follow by counting lines and spaces, just like in the treble clef. Sheetly reads the common clefs (treble, bass, alto and tenor), so a viola or cello part scans the same way a violin part does, and so do flute, oboe, clarinet, trumpet and horn parts.
How to scan a violin part
A violin part is the easiest kind of page for a sheet music scanner. The hard problems in reading a photographed page are structural: piano music has two staves to brace together, and a choral score has four or more staves that must line up. A violin part has one staff per line, a clef that almost never changes and one note at a time.
What is left are the ordinary challenges a good scanner handles well on a printed page: high ledger lines, accidentals, grace notes and fast runs. In Sheetly's own testing, single-staff pieces are consistently among the cleanest reads. When mistakes do appear, they usually come from the photograph, not the music: a shadow across the staff, a curling spine or an angled shot.
- One page, flat. Loose sheets lie flat on a table on their own. For a bound method book, press the spine down so the staves stay straight.
- Square-on, staff filling the width. Hold the phone parallel to the paper, centred, with the staves running straight across the frame.
- Mind the light. A music stand under a lamp puts your own shadow across the page, so step to the side or take the page to a table. Even, flat light makes the biggest difference.
- Listen once at tempo. Play the part straight through. A wrong note stands out right away, and a missed accidental sounds like a note that does not belong in the key.
- Then slow it down. Drop the tempo to something you can actually play, and loop the bars that give you trouble.
If you have a PDF of the part, from your orchestra's librarian or a public-domain library like IMSLP, import it directly and skip the camera.
Practise with your part playing back
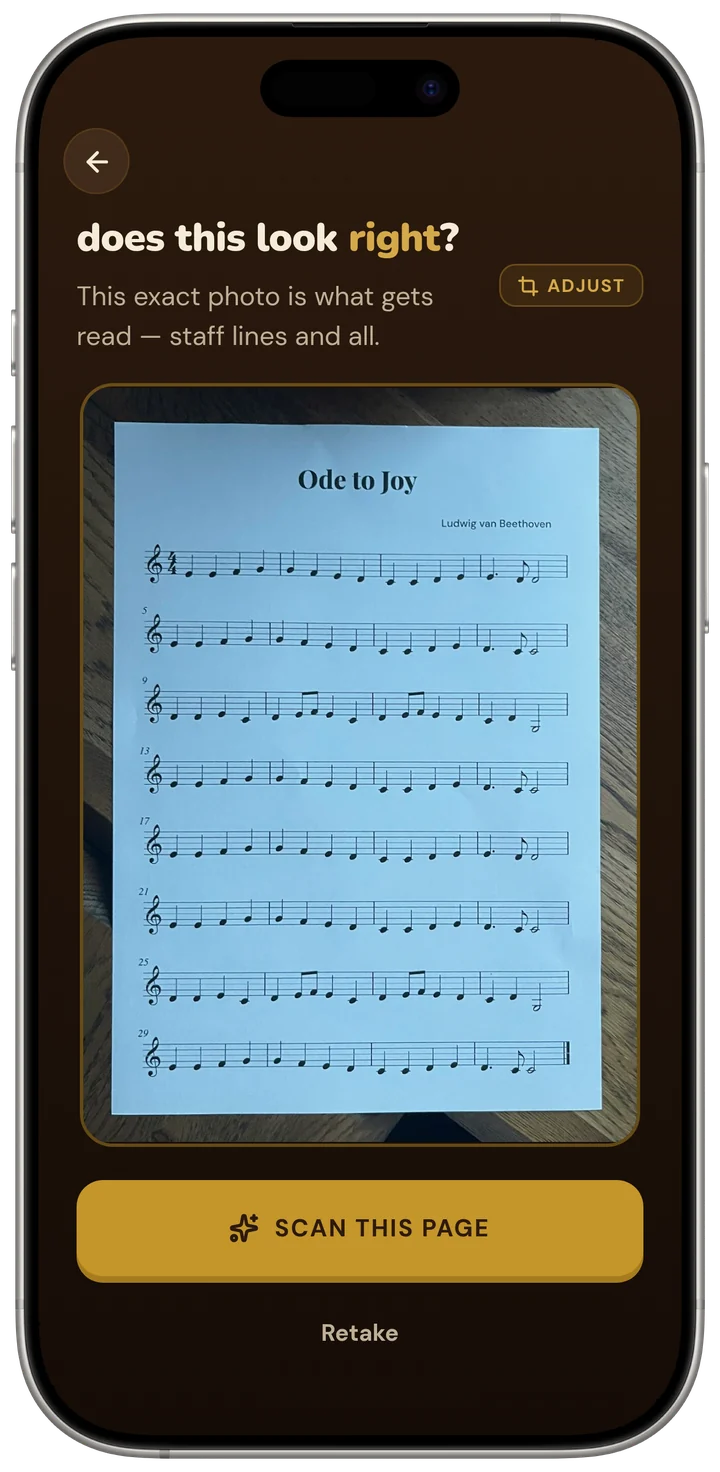
Reading the part is one half of practice. Hearing whether you played it right is the other, and between lessons that is the hard part. That is what we built Sheetly for. Photograph your violin part with an iPhone or iPad, and Sheetly plays it back with a playhead that follows the notes, on a violin sound or on viola, cello, piano, organ or any other instrument on the list.
- An intonation reference that does not move. Playback is made from the notes, not from a recording, so slowing it down does not bend the pitch. Play the passage against it slowly and listen for where your note rubs.
- Hear the phrase before you learn it. Hearing it first shows you the shape of the line, where it peaks, and which notes matter most.
- Loop the shift that keeps going wrong. Loop the four bars around it, slowly enough that the shift lands cleanly every time, then raise the tempo.
- Record your own take. Play against the part, record it and listen back. Rushed notes and sliding intonation are much easier to hear from outside than from behind the instrument.
Sheetly plays the notes, rhythms, clefs, key and time signatures. Finger numbers, bowing marks and position markings are for you, not for the playback. But you can ask the built-in coach about them. It has the actual notes of the part you scanned, so "does bar 9 need a shift?" gets an answer that looks at your bar 9, and it can suggest which string and finger to use for notes in first position.
Use playback as a check, not a shortcut. Read the bar first, with its fingers and bowings, then press play and compare.
Questions
Does a violin sheet music scanner read fingerings and bowings?
Sheetly reads and plays the notes, rhythms, clefs, key and time signatures. Fingering numbers, bowing marks and position markings are not part of the playback. The coach has the notes of the part you scanned, so it can still talk about fingering and positions for any bar.
What is the difference between alto clef and treble clef?
Alto clef puts middle C on the middle line of the staff, while treble clef puts the G above middle C on the second line. Viola music uses alto clef so that most of its range sits on the staff with few ledger lines.
What does first position mean on the violin?
First position is the hand position closest to the scroll, where finger 1 plays the note one step above each open string. Moving the hand further up the neck takes you to second, third and higher positions.
What is the difference between a slur and a tie on the violin?
A slur joins notes of different pitches and means play them in one bow. A tie joins two notes of the same pitch and means hold them as one longer note.