Record a Take and Hear Yourself Back: How to Listen to Your Own Playing
Do you sound different on a recording than you do in your head? In this guide, we show you how to record a take, when to listen back, and exactly what to listen for so every recording gives you one clear thing to fix.

Have you ever played a passage that felt great, then heard a recording of it and barely recognised yourself? Almost every musician has. While you play, your attention is busy with your hands, your breath and the next note, so you only hear part of what comes out. That is why one of the most useful habits in practice is to record a take and hear yourself back.
A take is simply one recording of you playing a passage from start to finish, as if it counted. Listening to it turns you from the player into the listener, and the listener hears things the player cannot: the rushed notes, the note that was always slightly flat, the breath in an odd place.
In this guide, we walk you through how to record a useful take, why you should wait before you listen, what to listen for, and a small routine that turns one recording a day into steady progress. There is a picture for the key ideas, and it works whether you take lessons or teach yourself.
Why listening back works
When you listen straight after playing, your memory gets in the way. You remember what you meant to play, and your brain helpfully fills in that version. That is why almost everyone thinks a take went better than it did.
Leave it for a day, and the memory fades. Now you are just a listener, hearing the recording the way your teacher, your band director or an audience would. That is when the rushed sixteenth notes in bar 9 jump out at you. It can feel a bit brutal the first few times. It is also one of the most honest feedback tools you have, and it costs nothing.
How to record a take and hear yourself back
Step 1: Record one take, as if it counts
Warm up and practise as normal. Then, at the end of the session, record the passage you worked on today. Record it once. Play it the way you would in a lesson or a concert: no stopping, no starting again when you slip. If you make a mistake, keep going, exactly as you would on stage.
One take matters more than ten. If you record ten, you will play the first nine carelessly because you know there is another one coming, and you will never listen to all of them anyway.
Recording with or without headphones
If you play along with a backing or a playback of the score, decide whether you want to hear it on the recording. With headphones on, the phone's microphone picks up only your playing, which shows you exactly how you sound alone. Without headphones, it picks up you and the playback together, which shows you how well you sit with the written rhythm. Both are useful, so try each one now and then.
Step 2: Wait until tomorrow before you listen
Put the phone down and leave the take alone. Start tomorrow's practice session by listening to yesterday's take, before you play a note. That way you listen with fresh ears, and what you hear decides what you practise today.
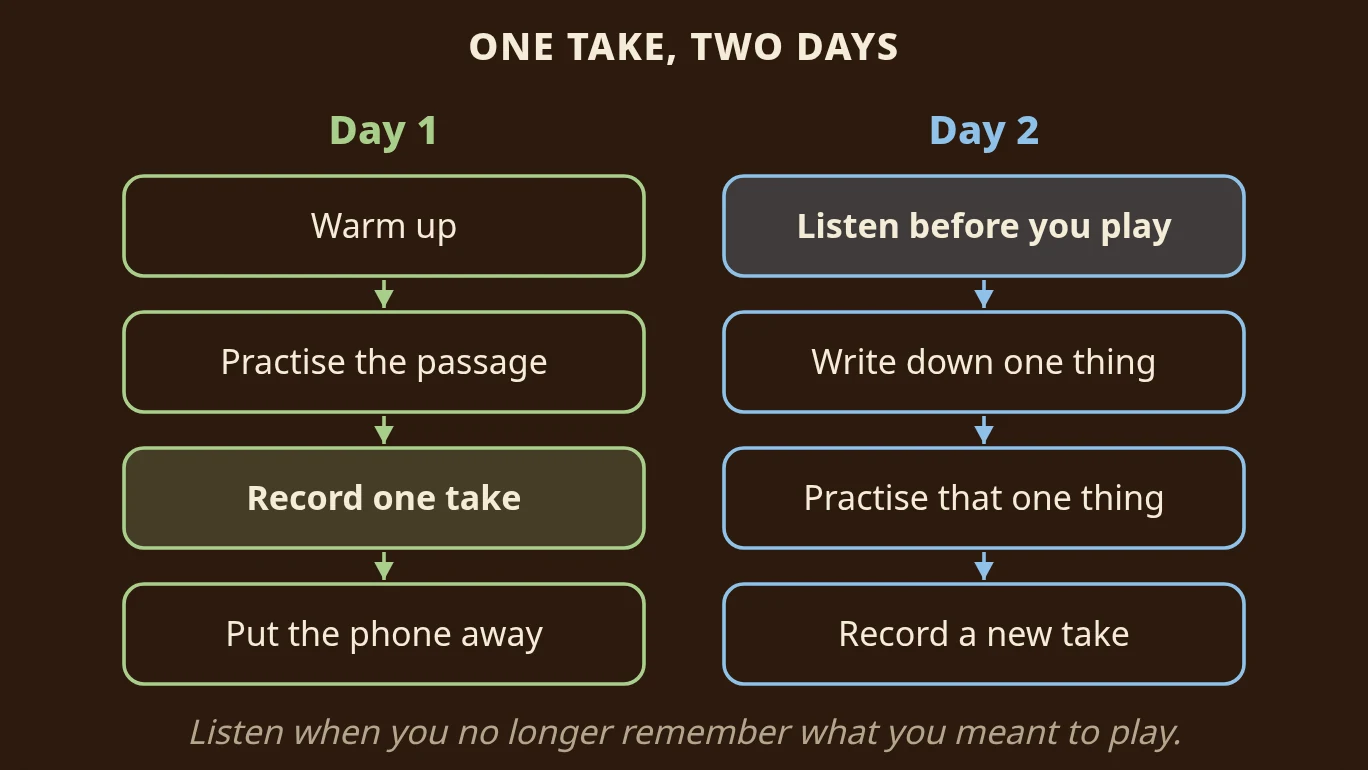
If you really cannot wait a whole day, at least wait until after a break. A walk, a meal or another task in between helps your memory let go of what you meant to play.
Step 3: Listen for one thing at a time
Trying to hear everything at once usually means hearing nothing in particular. Instead, listen to the take several times, and each time focus on just one thing. Have your music and a pencil ready, and mark what you hear right on the page.
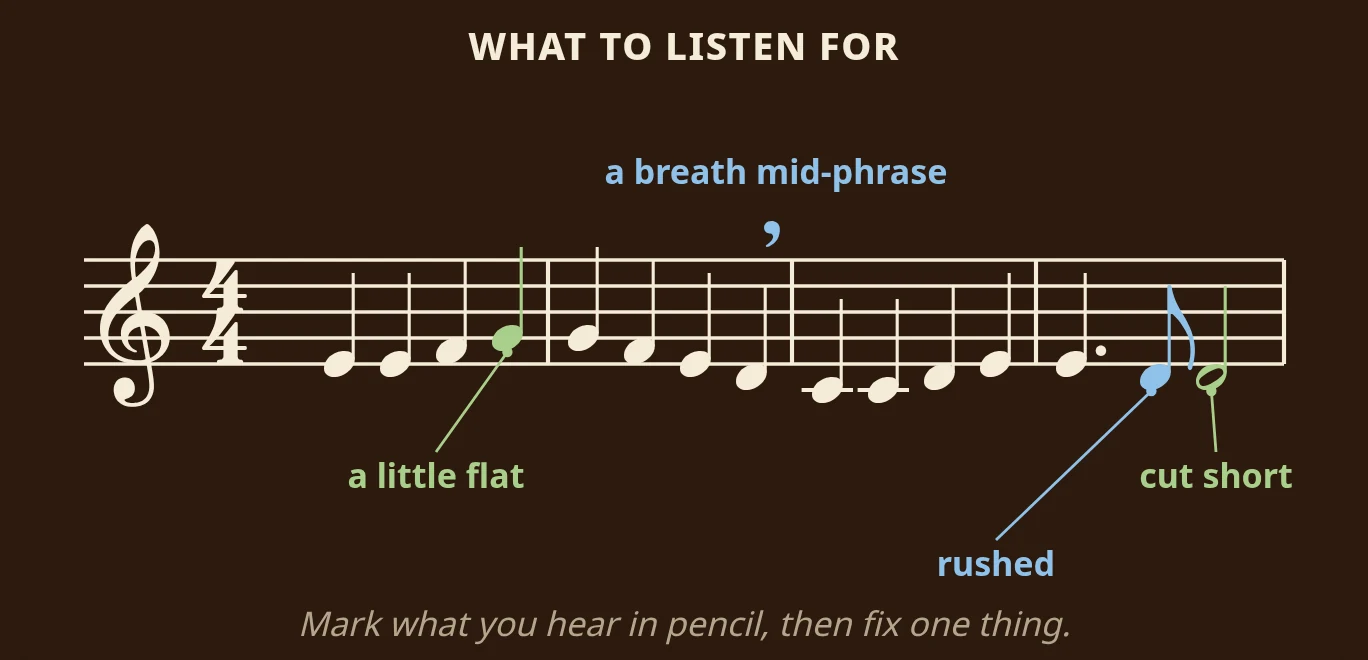
Here are four passes that work for almost any instrument or voice:
- Rhythm. Listen with the music in front of you and tap the beat. Do the short notes come too early? Does the tempo speed up in the easy bars and slow down in the hard ones? In the opening of Ode to Joy, the eighth note in bar 4 is the one most players rush.
- Pitch. Are any notes a little flat (too low) or sharp (too high)? Wind and string players often find that one particular note is always slightly out, because of how the instrument sits on that note. Once you know which note it is, you can listen for it while you play.
- Breaths and joins. Can you hear a breath, a gap or a bump in the middle of a phrase? Ode to Joy has four-bar phrases, so a breath after bar 2 breaks the line in half. Plan your breaths, and mark them on the music.
- Note endings. Does each long note last its full length, or do you let go early? A half note cut short and a held note that runs into a rest are both very common, and both are easy to fix once you hear them.
Step 4: Write down the one thing that bothered you most
After your passes, choose the single thing that bothered you most and write it down. Not a list of ten problems: one. That is today's practice. If it was the rushed eighth note, loop that bar slowly with a correct playback until the rhythm sits. If it was the breath, mark where you will breathe and play the phrase through.
Choosing one thing keeps practice focused, and it means each new take has one clear question to answer: did that thing get better?
Step 5: Keep your best take
Delete the takes you do not need, but keep the best one for each piece. When a new take is better than the one you kept last week, it replaces it. Over a month, you end up with a short record of the piece getting better, and listening to the first and latest takes side by side is far more encouraging than you might expect.
Common mistakes
- Listening only once. One listen gives you a general feeling. Several focused passes give you something you can fix.
- Judging the whole take. "That was bad" is not useful. "The eighth note in bar 4 was early" is.
- Recording only when it is going well. Record at the end of every session, so you hear your normal playing, not your best moment.
Record a take in Sheetly
A recording on its own tells you how you sounded. It does not tell you how the passage was supposed to sound, unless you already know. That is the gap we built Record in Sheetly to fill.
Take a photo of your printed part with your iPhone or iPad, and Sheetly plays it back with a playhead that follows the notes. Set the tempo and the instrument, tap Record at the far right of the bottom bar, and play your part along with the score. Your take is saved on your device in the Recordings folder of your Library, so you can play it back tomorrow and hear yourself next to the notes that were written. There is no grading and no score out of a hundred: just you, the music and your ears.
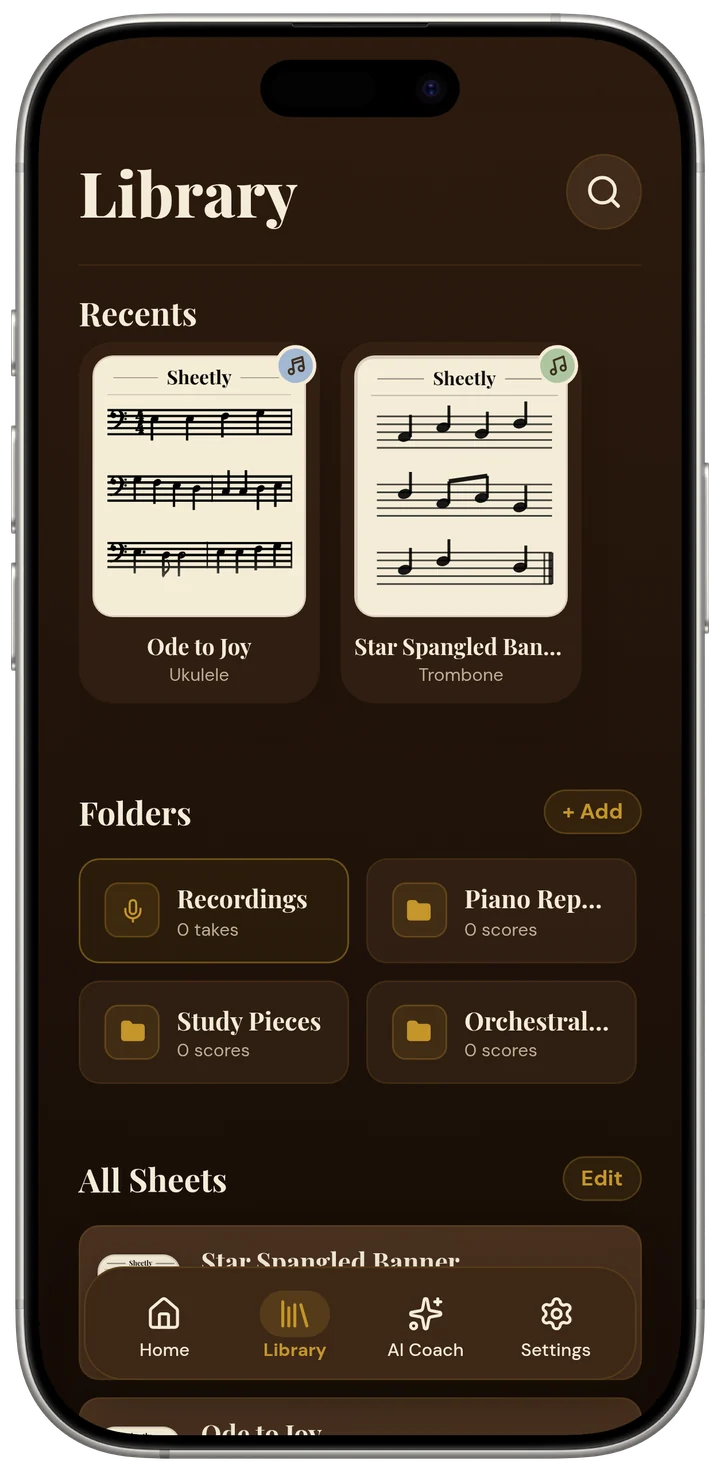
Scores you have already scanned play offline, so you can record in a practice room with no signal. Record one take tonight, then leave it alone until tomorrow.
Questions
Does Sheetly grade my playing?
No, and that is deliberate. A take is a recording of you playing along with the score. You listen back and hear what a listener hears. There is no score out of a hundred and no red and green notes.
Where do my takes live?
On your device, in the Recordings folder of your Library. Keep the ones you are proud of and delete the rest.
Should I record with or without headphones?
The take comes from the phone's microphone. With headphones on, it captures only your playing; without them, it captures you and the score's playback together. Use the first to hear yourself on your own, and the second to hear how you sit against the written rhythm.
How often should I record myself?
One take at the end of each practice session is plenty. Listen to it at the start of the next session, pick one thing to fix, and practise that.